How To Flash A Chimney
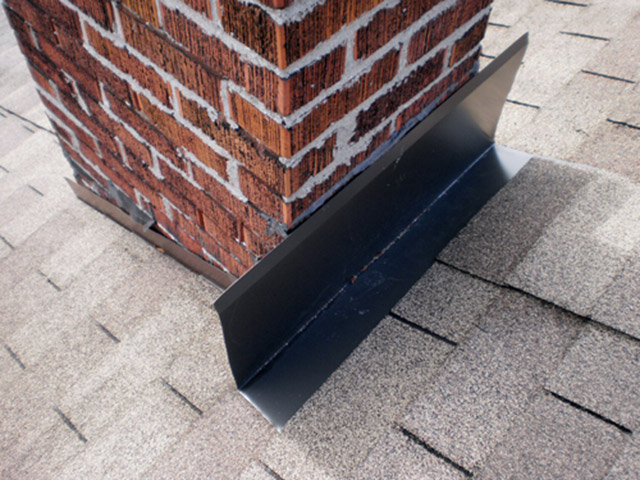
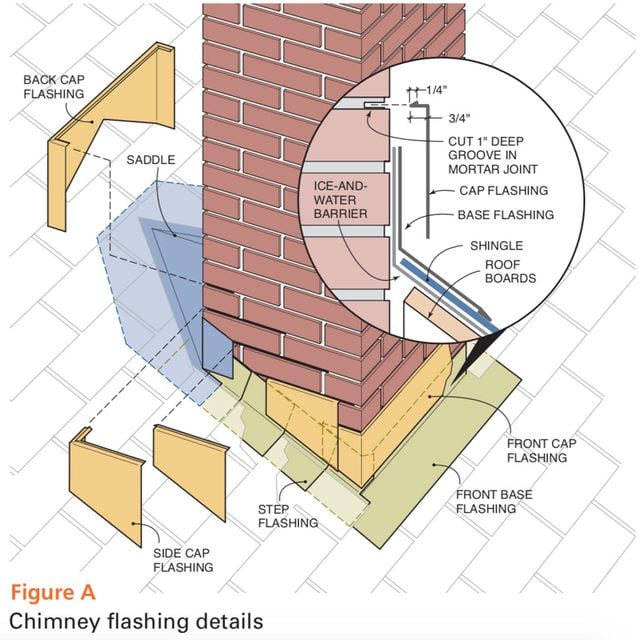
If the chimney is narrow less than 30 inches wide and there is no cricket make sure that the cap flashing on the top side of the chimney extends high enough up the chimney and up the roof. Pan flashing should extend at least 12 inches up the roof plane.
 Chimney Flashing And Repair Champion Roofing
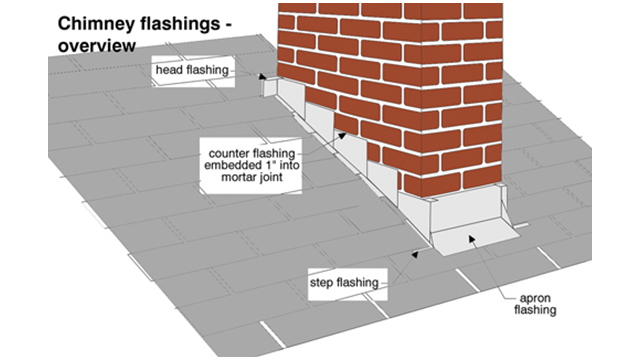
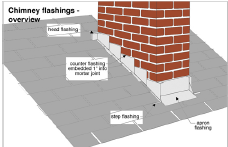
The counter flashing extends from the layer of bricks and then bends down overlaying the top edges of the primary step flashing.

How to flash a chimney. On top of the step flashing is the counter flashing. This is not the correct way to install counterflashing because when the caulk fails. Base flashing is attached to the deck by nailing them into position.
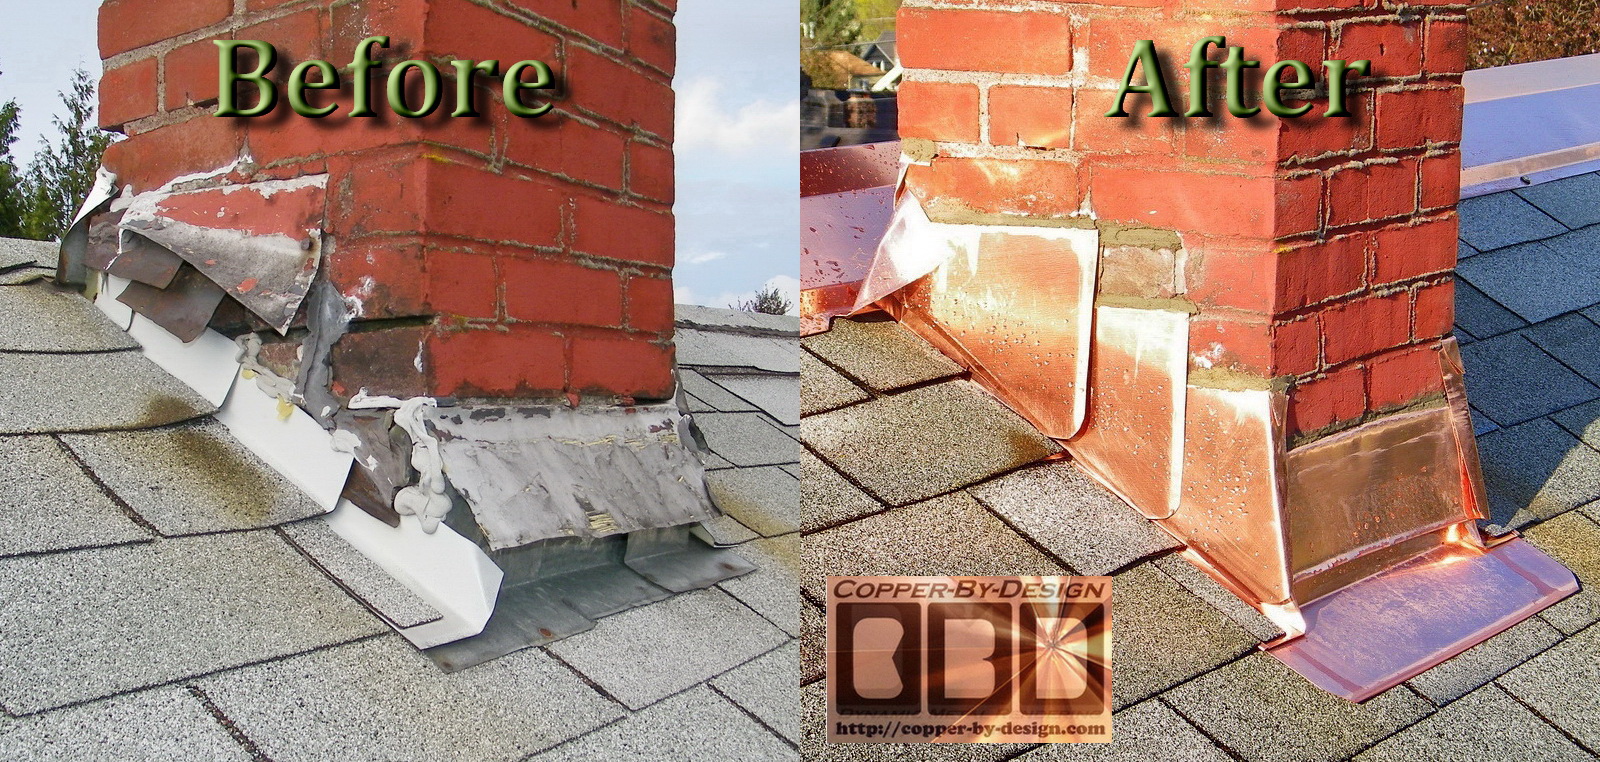
And more often than not the culprit is the flashing the sheet metal that keeps the intersection between the chimney and roof watertight. Base flashing involves the side of your chimney. One sure-fire method is to run a hose around the area where your chimney and roof meet.
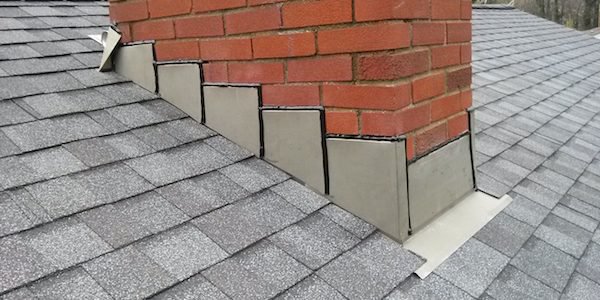
The first is the base or step flashing which is found under your roofs shingles and bent upwards against your chimneys exterior. The material for step flashing can be over 3 inches wide and tall. After running the water for a few minutes check the inside of the chimney for signs of water or moisture.
Httpamznto2CJY6eVGet the reinforcement fabric here. Water sheds from off the brick chimney surfaces down over the outside edge of the step flashing. Check to find out if the flashing is loose anywhere.
Flashing a chimney correctly involves two layers of metal. Start the flashing job by installing the first piece of base flashing across the bottom of the chimney and over the top of the shingles Photo 3. Counter flashing is bent down and installed in the mortar joints of your chimney.
Make sure the bottom cap flashing extends down at least 4 inches onto the shingles. Many roofers will surface mount chimney counter flashing by attaching a flat piece of metal to the chimney surface and apply a bead of caulk to the top edge of the flashing. Such flashing on the side of your chimney is known as step flashing.
The first is called step flashing. Then seal the sides of the chimney with pre-bent pieces of step flashing under each course of shingles Photos 4 and 5. Proper flashing around a chimney includes two layers.
He almost always chooses copper for chimney-flashing jobs because of its appearance endurance receptiveness to soldering and malleability. In this article roofing contractor Dyami Plotke explains how he tackles each step in the flashing process. Slightly flatten the step.
Screw the pan flashing to the roof with gasket screws. That means actually climbing up on the roof and checking all around the chimney to look for any signs of breaks or cracks. Cut and fold pan flashing to fold up the back of the chimney and over the sidewall trim.
Scheduling annual inspections can also help you identify any chimney flashing leaks. The counter flashing is either cut into the brick face or embedded into the mortar between brick layers. How to Maintain Chimney Flashing Make a habit of visually inspecting your chimney flashing at least twice a year.
Rivet the pan flashing to the sidewall flashing. There are a few parts that make up the entire chimney flashing. Make sure there is a cricket if the chimney is 30 inches wide or more.
Sections of L-shaped sheet metal are woven into the shingle courses and lapped up the side of the chimney.
/cdn.vox-cdn.com/uploads/chorus_asset/file/19489400/chimney_water_x.jpg) Leakproof Flashing This Old House
Leakproof Flashing This Old House
 Steel Chimney Flashing Kit At Menards
 Chimney Flashings
How To Flash A Chimney 6 Steps With Pictures Wikihow
 How To Use Flashseal Chimney Flashing Repair Youtube
 Chimney Flashings
 Roof And Chimney Flashing Is Your Home Watertight Chimneys Plus
 Installing Chimney Flashing Diy Family Handyman
 How To Flash A Chimney On A Shingle Roof Arxiusarquitectura
 Chimney Flashings Carson Dunlop Home Inspection Training
 Installing Chimney Flashing Diy Family Handyman
 Installing Chimney Flashing Diy Family Handyman
 Guide To Roof Flashing Installation Roof Flashing Repair Types Iko


Comments
Post a Comment